Attention
This documentation is under active development, meaning that it can change over time as we refine it. Please email help@massive.org.au if you require assistance, or have suggestions to improve this documentation.
PyTorch and CUDA#
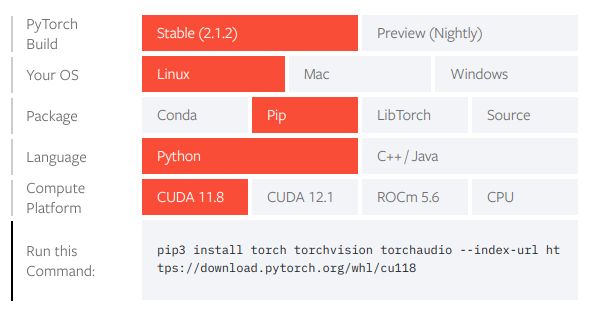
When using PyTorch on M3/MonARCH, you do not need to load any CUDA modules to take advantage of the GPU. This is because PyTorch bundles its own CUDA so long as you follow their instructions for pip or conda installing with CUDA. As an example from those instructions, you could use pip to install PyTorch with CUDA 11.8 like so:
$ pip3 install torch torchvision torchaudio --index-url https://download.pytorch.org/whl/cu118
TensorFlow and CUDA#
Attention
As of 18/Jan/2024, TF >= 2.12 will likely not work with CUDA on our GPU nodes. This is due to our NVIDIA drivers being out-of-date. If you want to know the maximal CUDA allowed on a particular GPU node, connect to that node and run nvidia-smi, and look for CUDA Version: X.Y.
Until TensorFlow (TF) v2.15, TF did not bundle CUDA in their pip installs, which means you need to module load CUDA and cuDNN
in order to take advantage of CUDA acceleration on our GPU nodes.
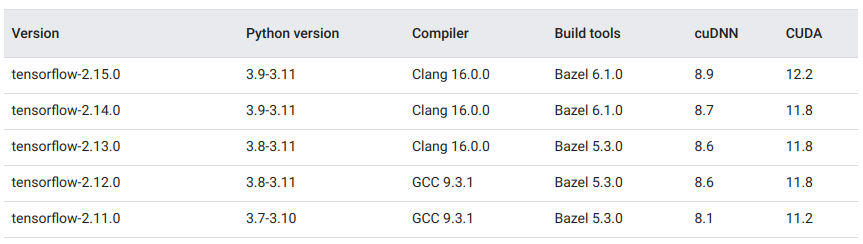
It’s important that you load *compatible* versions of CUDA and cuDNN. In order to identify compatible versions of CUDA and cuDNN (and Python), see this table in TF’s docs . This table lists the tested configurations of TF and CUDA versions. For example, this table confirms that TF 2.11.0 is compatible with Python 3.7-3.10, CUDA 11.2, and cudNN 8.1.
You may need to use slightly different versions of CUDA and cuDNN based on what’s available on our cluster (module avail cuda or module avail cudnn to list our versions).
A rule of thumb is:
Use a CUDA with the same major version and a greater or equal minor version. For example, if the table says CUDA 11.2, you can try using any CUDA >=11.2 but <12.
Same goes for cuDNN. Watch out though because some of our cuDNN modules load a specific CUDA version, which may conflict with your desired version!
Using an existing TF module#
We already have some TF modules available. If you only want TF and nothing else, then these may be suitable for your needs, and most of them should automatically handle the CUDA loading for you. For more details on using modules, see Software on M3.
[lexg@m3-login1 tensorflow-cuda]$ module avail tensorflow

-------------------------------------------------------------------------------------- /usr/local/Modules/modulefiles --------------------------------------------------------------------------------------
tensorflow/1.0.0-python2.7.12-gcc5  tensorflow/1.12.0-python2.7.12-gcc5 tensorflow/1.14.0-keras-pydicom     tensorflow/1.4.0-python2.7.12-gcc5  tensorflow/2.2.0
tensorflow/1.10.0-pytorch           tensorflow/1.12.0-python3.6-gcc5    tensorflow/1.15.2-gpu               tensorflow/1.4.0-python3.6-gcc5     tensorflow/2.3.0
tensorflow/1.10.0-pytorch-all       tensorflow/1.13.1-gdal              tensorflow/1.15.2-python3.7.3-gcc8  tensorflow/2.0.0-beta1              tensorflow/2.4.1
tensorflow/1.10.0-pytorch-keras     tensorflow/1.14.0-keras             tensorflow/1.3.0-python2.7.12-gcc5  tensorflow/2.0.0-gpu(default)

# This TF module is already configured with CUDA, so it should just work on any of our GPU nodes
[lexg@m3-login1 tensorflow-cuda]$ module load tensorflow/2.4.1
Creating an environment with venv + pip#
For more details on python virtual environments, see Running Python Virtual Environments on M3.
If you want to use a simple Python venv to install TF, you must remember to module load cuda whenever you want to use that venv. E.g.
# Load some Python version compatible with your desired TF version
$ module load python/3.9.10-linux-centos7-haswell-gcc10.2.0
# Navigate to where you would like the virtual environment (i.e. not your HOME directory! It will fill up quickly)
$ cd /path/to/my-project/
# Create an empty Python virtual environment (venv)
$ python -m venv tensorflow-env
# Activate your environment
$ source tensorflow-env/bin/activate
# Install desired TF version. Note that we include the prompt below which  has changed due to the virtenv
(tensorflow-env)$ pip install tensorflow==2.11
$ module load cuda/11.3 cudnn/8.2.4
(tensorflow-env)$ python3 -c "import tensorflow as tf; print(tf.config.list_physical_devices('GPU'))"
[PhysicalDevice(name='/physical_device:GPU:0', device_type='GPU
If you only see an empty list [] as the final output, that means the GPU was not recognised. This may be because:
You are not on a GPU node. If
nvidia-smireturns “Command not found”, then you are not on a GPU node.You have not activated your environment. Try
which pythonand verify that it’s pointing to your virtual environment.Something else has gone wrong. Look carefully at the the output to see if any errors were logged.
As of TensorFlow 2.15 , you may run pip install tensorflow[and-cuda] and TensorFlow will bundle its own CUDA for you, meaning you will not have to module load cuda to get TensorFlow to use the GPU. HOWEVER, this is pointless unless the GPU node you are using has up-to-date drivers. Please inform us if this documentation is out of date!
Creating an environment with conda#
Attention
You probably need to build your TF+CUDA environment on a GPU node else you may see an error like tensorflow-gpu=2.8 -> tensorflow==2.8.1=cuda112py310he87a039_0 -> __cuda
Conda is an alternative to using python -m venv. For more details, see Running Python and conda on M3.
It has the advantage in this case that you can install your own CUDA version within your environment, so you don’t need to module load cuda when using this environment. e.g. to install TF 2.8
# Here I load mamba, which is a *faster* drop-in replacement for conda
$ module load miniforge3
# Create the environment in the current working directory (do not do this in HOME! It will fill up quickly) with CUDA and cuDNN included
$ mamba create -y --prefix=$PWD/tensorflow-2.11-conda -c conda-forge tensorflow-gpu=2.8 cudatoolkit=11.2
# Activate environment
$ . /usr/local/miniforge3/23.3.1/conda/bin/activate $PWD/tensorflow-2.11-conda
# Assuming you are on a GPU node, you can test if TF can load CUDA and detect the GPU.
(tensorflow-conda)$ python3 -c "import tensorflow as tf; print(tf.config.list_physical_devices('GPU'))"
[PhysicalDevice(name='/physical_device:GPU:0', device_type='GPU')]
We recommend using the conda-forge channel over the default anaconda channel, since conda-forge tends to be more up-to-date.