Connecting to M3 with Visual Studio Code and Strudel2#
Note
The Visual Studio Code feature and these instructions are new! If you run into any trouble using the VS Code feature, or have feedback for this documentation, please email us at help@massive.org.au so we can continue working on improvements.
Introduction#
We provide a variety of methods for accessing compute on M3, including desktops and JupyterLab sessions with Strudel2. Community feedback has highlighted the demand for best practice instructions for connecting to M3 with Visual Studio Code (VS Code). These instructions will provide a step by step guide for setting up a VS Code remote server on M3.
Note
Please do not follow the official VS Code documentation for remote servers. If you follow those instructions, you will end up running the VS Code remote server on a login node. The login nodes are a shared resource and we would rather allocate a resource just for you.
Set-Up Instructions (only do these steps once)#
1. Prepare VS Code#
Install Visual Studio Code
Install the Remote Development Extension Pack
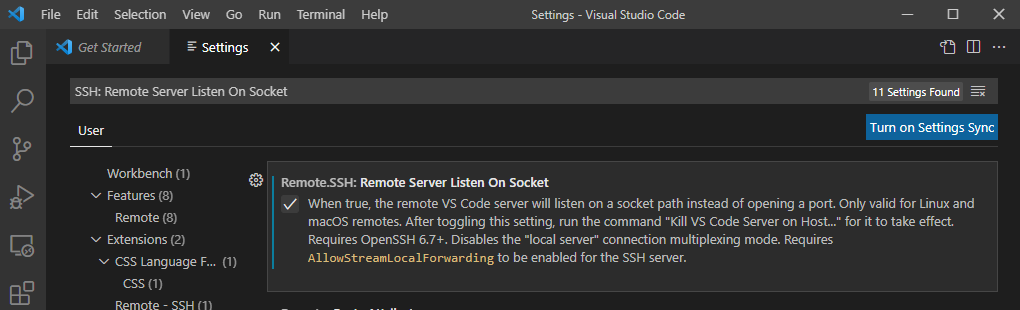
- In VS Code, open
SettingswithCtrl+,and search for Remote.SSH: Remote Server Listen On Socket. Select the checkbox.
- In VS Code, open
2. Generate an ssh key and add it to the ssh agent#
You may be familiar with using passwords to authenticate to M3 - ssh keys are another, more secure method of authenticating. If you’re unfamiliar with ssh keys, no worries - we’ll step you through how to set one up here. If you want to learn more about why ssh keys are more secure than passwords, this YouTube video for AWS does a good job of explaining it.
The process for creating keys and adding them to your ssh agent differs between Windows and Linux/Mac.
Mac and Linux Instructions
Note: These instructions will refer to your local terminal, as well as the Strudel2 terminal. Pay attention!
Firstly, we need to generate an ssh key-pair. Open a local terminal, and run the following command:
ssh-keygen -t ed25519
You will be asked where you would like to save the keys. Press enter to keep the default location. You will also be asked to enter a passphrase. This will be used to encrypt the private key on your computer. There will be a print out of your key's fingerprint and location on the screen.
You should now have a public and private key in your ~/.ssh directory,
which will be named id_ed25519.pub and id_ed25519
respectively. Never share your private key with someone else.
Secondly, you will need to copy your public key into M3. To do this, run the following command:
cat ~/.ssh/id_ed25519.pub
Copy the line of text printed on the screen.
Start a terminal session in
Strudel2
by selecting Terminal from the sidebar on
the left-hand side of the screen, and then selecting Run on Login Node.
This will open a terminal on M3 in a new tab. Ensure you have copied the public key from before, and run the following command in the Strudel2 terminal:
echo (paste the line you just copied) >> .ssh/authorized_keys
This will add your public key to M3 and allow you to authenticate using your new ssh-keys. Close the Strudel terminal tab and terminate the terminal session.
Finally, you will want to add your ssh keys to the ssh-agent. You will remember setting a passphrase earlier for accessing your private key. When you add a private key to the ssh-agent, it will ask for your passphrase once, and then remember it until the next time your computer reboots. This means you won't need to enter a passphrase everytime you log in to M3 with your keys.
To do this, open a local terminal and run:
ssh-add ~/.ssh/id_ed25519
Windows Instructions
Install and enable OpenSSH
1. Check OpenSSH is installed
-
Navigate to
Settings > Apps > Apps & Features. -
Select
Optional Features. -
Check if
OpenSSH Clientis in the list. If it is, go to step 2. -
If it isn't, select the
Add a featurebutton at the top of the page, then selectOpenSSH ClientandInstall. This will install the OpenSSH Client.
2. Once installed, you will need to start the OpenSSH Client
-
Use the Windows search bar to search for and open
Services. -
Scroll through the list to find
OpenSSH Authentication Agent. -
Double click
OpenSSH Authentication Agent. Change the Startup type toAutomaticand selectOK. -
Double click on
OpenSSH Authentication Agentagain and selectStart.
The OpenSSH Agent will start automatically in future. Now we can create your ssh keys!
Create ssh keys and add them to the ssh-agent
Note: These instructions will refer to your local terminal, as well as the Strudel2 terminal. Pay attention!
Firstly, we need to generate an ssh key-pair. Open a PowerShell terminal, and run the following command:
ssh-keygen -t ed25519
You will be asked where you would like to save the keys. Press enter to keep the default location. You will also be asked to enter a passphrase. This will be used to encrypt the private key on your computer. There will be a print out of your key's fingerprint and location on the screen.
You should now have a public and private key in your ~/.ssh directory,
which will be named id_ed25519.pub and id_ed25519
respectively. Never share your private key with someone else.
Secondly, you will need to copy your public key into M3. To do this, run the following command:
cat ~/.ssh/id_ed25519.pub
Copy the line of text printed on the screen.
Start a terminal session in
Strudel2
by selecting Terminal from the sidebar on
the left-hand side of the screen, and then selecting Run on Login Node.
This will open a terminal on M3 in a new tab. Ensure you have copied the public key from before, and run the following command in the Strudel2 terminal:
echo (paste the line you just copied) >> .ssh/authorized_keys
This will add your public key to M3 and allow you to authenticate using your new ssh-keys. Close the Strudel terminal tab and terminate the terminal session.
Finally, you will want to add your ssh keys to the ssh-agent. You will remember setting a passphrase earlier for accessing your private key. When you add a private key to the ssh-agent, it will ask for your passphrase once, and then remember it until the next time your computer reboots. This means you won't need to enter a passphrase everytime you log in to M3 with your keys.
Copy paste the location of your private key, which would have been printed on the screen in your
PowerShell terminal earlier. For example, C:\Users\username/.ssh/id_ed25519.
Run the following in your PowerShell terminal to add the key to your ssh-agent:
ssh-add (path\to\.ssh/id_ed25519)
3. Configure VS Code#
Open VS Code and open the Command Palette (F1). In the dropdown menu,
select Remote-SSH: Add New SSH Host... or click on the Add New icon in
the SSH Remote Explorer in the Activity Bar.
You’ll then be asked to enter SSH connection information.
Make sure you replace username with your M3 username.
Mac and Linux Instructions
On Mac and Linux, enter:
ssh -l username VSCode -o ProxyCommand="ssh username@m3-login3.massive.org.au /usr/local/sv2/sshnc.sh"
Windows Instructions
On Windows enter:
ssh -l username VSCode -o ProxyCommand="ssh.exe username@m3-login3.massive.org.au /usr/local/sv2/sshnc.sh"
The proxycommand allows you to connect to a node allocated to you rather than one of the login nodes. This is different to the usual VS Code Server setup because you’re on a shared HPC cluster, not a regular server.
Using your VS Code remote server (do these steps every time you need a VS Code session on M3)#
4. Allocate resources for the remote server (i.e. start a job)#
Open https://beta.desktop.cvl.org.au/ in your web browser,
login and select a JupyterLab based application. Choose the resources you
will need, including GPU type, number of CPUs, amount of RAM and time, and click
Launch. Wait for the job to begin running under Pending/Running Jupyter Labs.
5. Test the connection#
Mac and Linux Instructions
Open a terminal and on Linux and Mac enter:
ssh -l username VSCode -o ProxyCommand="ssh username@m3-login3.massive.org.au /usr/local/sv2/sshnc.sh"
Windows Instructions
On Windows, open a PowerShell terminal and enter:
ssh -l username VSCode -o ProxyCommand="ssh.exe username@m3-login3.massive.org.au /usr/local/sv2/sshnc.sh"
Verify that you can connect to M3. If you experience difficulties, this is the point to reach out to help@massive.org.au. This step will also prompt you to accept the public key for M3.
6. Start the remote server#
Open VS Code and open the Command Palette (F1).
Select
Remote-SSH: Connect to Hostfrom the dropdown menu and select theVSCodehost.If you didn’t add the private ssh key to the ssh-agent, VS Code will prompt you for your key passphrase. It will ask twice (once to the connect to the login nodes, then again to connect to the node running the remote server).
VS Code will prompt you for what type of server it is, select Linux.
You should now be connected to a VS Code session running on M3
Frequently Asked Questions (FAQ)#
Q: I see a message about “Connection Reset by peer” - what does it mean?
A: This will happen if you fail to authenticate too many times - perhaps typing in your key passphrase incorrectly. Wait 10 minutes, and try again. If you still run into errors please contact the helpdesk at help@massive.org.au
Q: I keep getting prompted for a password in an endless loop - what should I do?
A: Check that your connection command includes the username everwhere you need it (it should be in there twice, once for the login node and once for the compute node). Also, ensure you added your keys to the ssh-agent to avoid typing your key passphrase every time. You will need to do this after every reboot.
Q: I got an error message about posix spawn - how do I fix it?
A: You’re probably on Windows. Check that you used the Windows specific command with ssh.exe instead of ssh.
Q: I tried to use the ssh-agent but it says “Permissions mykey are too open.”
A: Private keys should never be shared - ensure only you have read, write, and execute permissions on your private key. Linux/Mac users see this StackOverflow post. Windows users, see this blog post.